ArmA 3 has already more than 1400 commands. While 1200 or so of them are ArmA 2, new commands are often not documented well enough. I think I should start including my findings in blog posts for future reference. So today it will be about distanceSqr, linearConversion, difficulty, setAmmo and drawIcon3D.
distanceSqr
As you know in order to calculate distance between 2 points in 3 dimensional world you need to:
distance = sqrt ((x2 - x1)2 + (y2 - y1)2 + (z2 - z1)2)
This is what the result will be if you use normal distance command. distanceSqr does not have square root operation, so it is useless for measuring actual distances but pretty useful if you want to just compare distances:
distanceSquared = (x2 - x1)2 + (y2 - y1)2 + (z2 - z1)2
Because it it has 1 less mathematical operation it is faster than distance and can be used to optimise scripts. However in my experiments the difference in speed appeared to be insignificant, nevertheless there is a difference. Usage:
distanceSquared = ObjectOrPositionOrLocation distanceSqr ObjectOrPositionOrLocation;
linearConversion
This command allows you to define two separate ranges, then take a value from one range and find its proportional value from another range. Complicated? Lets look at simple practical application. You have 390 apples in a box. You picked up 20 apples and what to know what percentage is it in relation to all the apples. You can do it the usual way:
Or you can use linearConversion:
The result will be the same: 5.12821. This command might be useful for all sorts of conversions including resizing, however it is quite a bit slower than a couple of math commands that would do the same thing. Usage:
R2Value = linearConversion [R1Start, R1End, R1Value, R2Start, R2End, allowClipping];
- R1Start (number) : range 1 start
- R1End (number) : range 1 end
- R1Value (number) : range 1 value (can be outside of the range)
- R2Start (number) : range 2 start
- R2End (number) : range 2 end
- allowClipping (boolean) : if true, output is always within range 2
You can specify R1Value outside of the range 1, this will obviously force R2Value to appear outside of the range 2. If allowClipping is set to true then the result that should be outside of the range 2 will be clipped:
difficulty
This command simply gives you the index of selected difficulty as it appears in CfgDifficulties. By default there are 4 difficulty classes: Recruit, Regular, Veteran and Mercenary (displayName “Elite”). I’ve added 1 more difficulty and called it Insane.
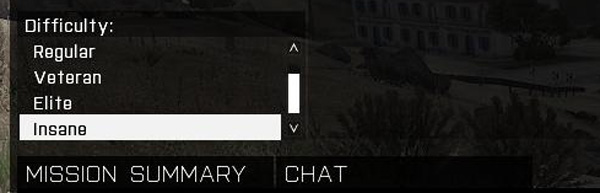
When selected “Insane”, the difficulty command returned 4. If “Regular” is selected the result is 0. Usage:
difficultyIndex = difficulty;
setAmmo
This command will set custom ammo count in the currently loaded magazine of the specified weapon. The wiki page at the time of writing contains incorrect information. Usage:
unit setAmmo [TypeOfWeapon, ammoCountInWeaponMagazine];
If you try to set more ammo than the magazine can hold, it will be clipped at default magazine capacity. Some examples:
drawIcon3D
This command allows you to display an image with a text underneath this image on your screen in 3D world. Pretty useful for tagging players and objectives. The trick with this command however is that icon it creates exists only for a fraction of a second. So if you want continuity or to even see the result, you have to call this command at least for every frame. Usage:
drawIcon3D [imgPath, color, pos3D, imgW, imgH, imgDir, text, effect, textSize, textFont];
- imgPath (string) : path to image : “\path\image.paa” (seems to want AddOn textures)
- color (array) : color for image and text : [r, g, b, a]
- pos3D (array) : icon position in 3D world : [x, y, z]
- imgW (number) : width of image relative to icon : 1 – fit with icon
- imgH (number) : height of image relative to icon : 1 – fit with icon
- imgDir (number) : image rotation angle : 0 – 360, 0 – no rotation
- text (string) : text to appear underneath the image : “some text”
- effect (number) : effect : 0 – plain, 1 – add shadow, 2 – add stroke
- textSize (number) : text size relative to HUD size : 0.03 – normal size
- textFont (string) : text font : “PuristaLight”
- NEW textAlign (string) : suppose to be able to align text
- NEW drawSideArrows (boolean) : draw arrows on edges of screen if icon is not on screen
To display dynamic semi transparent image of compass bearing above player head in blue:
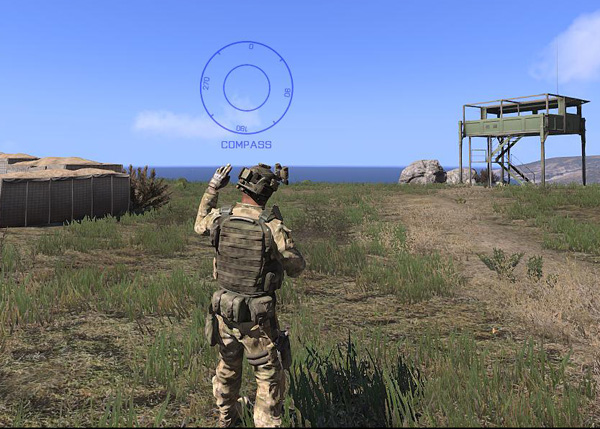
Use the following code:
Enjoy,
KK
EDIT: See also this link for drawIcon3D.