I won’t beat around the bush too much and might as well tell you that my interest in triggers at this moment is pretty much limited to using them as 0.5 seconds check loops. There are other uses of course, especially when you set triggers in the editor. But today I’m going to show you a scripted solution for setting up a trigger.
So what is the trigger? It is pretty much a “light switch” with a condition attached to it. If condition is true, the trigger flips from OFF to ON. Some triggers can be flipped back and forth, some can’t. This depends on the trigger set up. One thing is for sure, if trigger is flipped (activated) because condition of its activation is met, it will only do it once, even if condition has happened more than once. Let’s look at the following script example:
A trigger with repeated activation acts pretty much like the code above. conditionStatement, onActivationStatement and onDeactivationStatement are our hypothetical functions that mimic real trigger setup statements. You have probably noticed that triggerActivated is actually an ArmA command. In fact, this is pretty useful ArmA command that will tell you the current state of your trigger.
As you have probably also noticed from the above example, the trigger condition is also checked every 0.5 sec. This is good frequency for unimportant checks, like player object proximity check for instance. What you also should know is that these 0.5 seconds is the time allocated for all triggers checks. Remember onEachFrame loop? Consider trigger check a “every0.5sec” loop. And just like with onEachFrame and the duration of the frame, if all your trigger conditions checks won’t fit inside 0.5 seconds interval, you will start having nasty frame rate drop as engine will need to extend the time allocated for trigger checks.
How to avoid this? Keep condition statements sweet and short. Wouldn’t hurt to use lazy evaluation syntax as well. But most importantly make sure the trigger is set up correctly for your task. 0.5 seconds is like eternity in comparison with the speed of SQF execution so there is plenty of room to accommodate many triggers.
OK, now to the juicy bits. Trigger is an “EmptyDetector” class defined inside CfgNonAIVehicles class. Because it is considered a vehicle object, it follows the general rules for the objects. This means it can be attached to other objects with attachTo. This could be pretty useful if you need to attach a trigger to a moving object rather than fixed location. Triggers could also be deleted with deleteVehicle command. Let’s create a trigger:
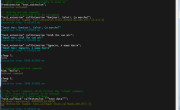
Now let’s see what kind of monster we have created with this script snippet:
And the result:
- trigger object – When you create a trigger you get a reference to the created trigger object, which you can use later in scripts. You can also obtain reference to trigger object from inside trigger statements with special variable thisTrigger
- trigger type – You can set a trigger to perform additional action to what has already been defined in onActivationStatement, like end a mission for example by setting trigger type to “END1” (you can of course end mission directly from onActivationStatement too with endMission command). Our trigger type is set to “NONE”, means no additional action will be performed. Command used for setting this parameter is setTriggerType
- trigger area – You can define the shape, size and orientation of the trigger detection area. Boolean shows if the area is elipse (false) or rectangular (true). The first 2 numbers are width and height of the shape. Equal numbers will give you circle and square. 3rd number is orientation angle. So our detection area is 50m circle around our trigger position. Command used for setting this parameter is setTriggerArea
- trigger activation – This will determine who or what can activate the trigger and under what circumstance. If trigger detects that its activation criteria is met within its detection area, it will set special variable this to true. This alone will not activate the trigger. Trigger is activated only if its conditionStatement returns true, which is different from trigger activation criteria being true. So the special variable this needs to be passed to the trigger conditionStatement. Only then if this is true the trigger will flip. As it stands nothing can activate our trigger at the moment and special variable this returns false. The boolean indicates whether a trigger is set up for repeated activation, which in our case is true. Command used for setting this parameter is setTriggerActivation
- trigger statements – This is the inner working of the trigger – conditionStatement, onActivativationStatement and onDeactivationStatement. conditionStatement is evaluated every 0.5 seconds regardless of anything. If you have created a trigger, it is already evaluating its condition every 0.5 seconds. What you put in the condition statement is up to you. By default, as you can see, special variable this (the result of trigger activation explained above) already exists in the trigger conditionStatement. onActivationStatement will only execute when trigger conditionStatement returns true and only if the trigger has not been activated (script example at the very beginning). If your trigger is set to allow repeated activation, onDeactivationStatement will execute when trigger conditionStatement returns false. At this point our trigger will return to its primary state and will get ready to get activated again. Command used for setting this parameter is setTriggerStatements
- trigger timeout – This is a countdown delay between trigger conditionStatement returning true and trigger executing onActivationStatement. First three numbers are min, mid and max delay values in case you need some randomness. Boolean indicates whether the delay countdown can be cancelled or not. If it is true and while counting down trigger conditionStatement returns false, the countdown is cancelled and onActivationStatement is not executed. Our trigger is set for immediate action. Command used for setting this parameter is setTriggerTimeout
- trigger state – This is true if trigger has been activated. Our trigger has not been activated yet.
- trigger list – This is the list of all objects that meet criteria set in trigger activation. To make it easier to understand: If this list is not empty, special variable this is true. From inside the trigger statement the same list can be obtained via special variable thisList.
- trigger attachment – You can make trigger to watch an entity, like a single unit for example. Triggers will execute their statements on the PC you set them up on. This makes it ideal for detecting if player is inside detection area for example. At the moment we haven’t instructed the trigger to watch any entity. If we were to make our trigger to watch a vehicle (like player), the trigger activation would change accordingly from “NONE” to “VEHICLE”. Command used for setting this parameter is triggerAttachVehicle
Practical uses? Alright! The easiest one would be to create interaction between player and an object. As you may know in Arma 3 you cannot attach actions to animals anymore due to some optimisation decisions. But you can still attach actions to player. Let’s say you killed an animal and need to “gut” its corpse. You can attach a trigger to the animal when it is dead that will only activate when you are, player, is close to it. Then in turn, the trigger will add “gut” action to you, the player.
Alternative would be to add a loop to check player proximity for dead animals which could be quite expensive. Or to add permanent action to player to “gut” animal with condition, which would be even more expensive, since action condition is checked every frame.
Or maybe you want to detect if a car is driving on a road and apply damage to it if it leaves the road? This time we can create trigger elsewhere since we are not going to use its detection area. Instead we are going to pass isOnRoad command to the trigger conditionStatement:
When the car leaves the road it will explode. BTW, it will also explode driving over a bridge due to some bug with Arma 3, when it thinks bridges are not roads. Though this issue has been assigned, so might get a fix soon. Oh yeah, make sure you delete the trigger after you done with it. Even a single activation trigger which could only ever activate once then execute its onActivationStatement code and then become useless, will still continue to run its conditionStatement every 0.5 seconds unnecessary. Some room for optimisation here, BIS!
The triggers are checked in order they were added and trigger statements therefore will also execute in the order triggers were added. This is why it actually makes sense to name triggers trigger1, trigger2, trigger3 etc. You can also have multiple triggers set up and add last trigger to summarise the condition of all triggers. Because onActivationStatement is triggered only once, you can safely spawn script from it and terminate it when trigger is deactivated without the need to check if the spawned script is already running.
Other trigger commands include: triggerAttachObject, which is broken at the moment but meant to be used to watch static objects, triggerTimeoutCurrent, setEffectCondition, setMusicEffect, setTitleEffect and setSoundEffect to set trigger effects upon activation, just like you do it in the editor. Think this is more than enough for this post.
Enjoy,
KK