So what is squad.xml? It is an ancient and spastic way to identify friends in Arma series. Maybe the only cool thing about it is that you can make custom logo for your squad and it will appear on vehicles when you enter them, provided they have appropriate proxy. Setting this up is never straight forward and in Arma 2 you would normally get kicked from a server if you have logo, unless server is configured to support logo images of up to certain size. Don’t think Arma 3 has the same problem though.
In order to give your squad (or clan actually) an identity, every member has to add a link to shared squad.xml file (which doesn’t have to be called “squad.xml” BTW) to their profile. Then this file has to be hosted somewhere on the internet so that when you join server, the server would fetch it and parse and also download the picture if squad has one. Then this picture will be distributed among every player on the server and will be pushed to JIP as well, whether you want it or not.
If this is not enough, you have to manually add squad/clan members to the .xml with their exact UIDs and exact profile names. And since the image could be anything, you have to also consider TTP (Time To Penis) phenomenon.
Didn’t take long, did it? 🙂 And what’s with <icq> tag? So last millennium. Anyway, BIS wiki has all the info you need on squad.xml. I simplified it so that it fits in one file and also made names optional. Here is template for you based on my video example:
KKS.xml
The new squadParams command returns squad and member data from squad.xml in a nice doable array:
The above is obtained from the client. Now compare the same obtained from the server:
The image path is local to PC it is executed on. This means you can use this image elsewhere, and this is what I did on the video. This is probably the coolest thing about this command. But it also, unfortunately, reveals the path to server profile which could be not safe. I used modified drawIcon3D example from earlier to demonstrate the principle:
So here is step by step guide.
- Make an .xml file, call it whatever you like
- Copy paste XML code from my template into it
There are 3 params that are essential for squad.xml system to work (and for squadParams to return something).
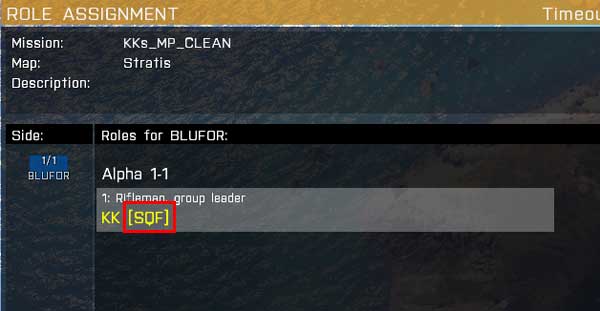
<squad nick> – this will be displayed next to your name in square brackets when joining the server like this: KK [SQF]. It will also become a folder in server or player profile containing the picture.
<member id> and <member nick> are your PLAYER ID and PLAYER NAME, obtainable from your configure profile page or through getPlayerUID and profileName commands.

The rest of params are optional and can be ignored. In fact if you are not planning on using an image, all you need is a single .xml file hosted somewhere and linked to from your profile.
- To make a picture for your squad, open Photoshop and make 256×256 image. Save it for web as PNG-24. Open this image in Text View editor (supplied with Arma Tools) and save as .paa instead of .png
- Add picture file name to .xml <picture>
- Upload both .xml file and .paa file to web/file hosting and note the URL
- Add the link to your profile under SQUAD URL
- Save
That is just yourself sorted. If you want to add more members to your squad/clan, you will have to copy paste <member>…</member> section to expand .xml with more members, then to re-upload it. The server requests .xml only once. For any recent changes to .xml to take effect you need to restart the server.
Enjoy,
KK

