Continuing GUI tutorial. As I have already mentioned, any dialog in ArmA is a combination of TYPE and STYLE. Type defines the basic functionality of the dialog, whether it is a simple box or a list or a button or maybe a slider. There is even a type for in-game map as well. Style defines other variations in dialog appearance or basic functionality. Some may requite additional parameters.
Because of the number of types and styles the range of possible dialogs is rather large, so I will not even attempt to cover each combination. BIS wiki is a good source for further learning in this case. So I’m going to stick with type = 0; for now but will show few styles that go with it. Below is a video of some of my recent experiments with ArmA dialogs:
Dialog size and positioning
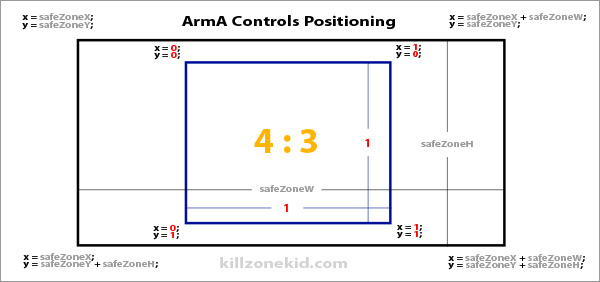
Have a look at the picture below. The blue box in the centre is your anchor. It is exactly the same on every monitor and every screen. It is always 4:3, it is always positioned at 0,0 and its size is always 1×1.
This is why when you build your GUI, the positioning and sizes of your elements will be calculated relative to this box. For example if you say your GUI element width is 0.5 (w = 0.5;) this means that it will be half of the width of the blue box since width of the blue box is 1. Keep in mind that the blue box is not square therefore w = 0.5; is not equal to h = 0.5; in screen size.
If for example you have your height (which will be relative to the height of blue box) and it is 0.7, in order to create a square box you cannot use 0.7 for the width too, as 0.7 in width field will be interpreted as size relative to the width of the blue box, which is 4/3 times its height. You will need to adjust this value accordingly:
But what if we need to know the total width or height of the screen and not just the centre box? There are two commands that will return relative width and height of the screen: safeZoneW and safeZoneH. So if the width of the blue box is w = 1; the width of your whole screen is w = safeZoneW; There is another command for the screen width, which is safeZoneWAbs. This command will give you the absolute width of your screen in case of multi-screen setup. So if you want your box to cover the whole screen:
For positioning you have to also keep in mind blue box ratio. The commands provided for beyond blue box positioning are safeZoneY and safeZoneX or safeZoneXAbs in case of multi-monitor setup. The top left corner of the screen is therefore:
Needles to say that safeZone coordinates of the top left corner of the screen (wide screen) are negative since they are relative to and are to the left and above the blue box default top left corner. Because there are many different screen sizes and ratios these values will be individual to each client. On my current PC for example they are:
- safeZoneX: -0.235402
- safeZoneY: -0.0882083
- safeZoneW: 1.4708
- safeZoneH: 1.17642
- safeZoneXAbs: -0.235402
- safeZoneWAbs: 1.4708
As you can see I have a single monitor so safeZoneX == safeZoneXAbs and safeZoneW == safeZoneWAbs. If you want to position your dialog top left corner it is pretty straight forward. If you want to put it bottom right corner you need to find out the bottom right corner x and y first then subtract the width and the height of your box from them. Check the diagram at the beginning of this tutorial part for reference.
The code example is below (by the way the little rectangular anomaly at the bottom is not part of the code):
This is it for this part. Styles next.
Enjoy,
KK


